The Linked list
What is a Linked List ?
A linked list is a series of nodes where each node points to the following node in the list. Each node must therefore have at least a data field and a pointer / reference to the next node in the list.
A linked list also has a HEAD node and a TAIL node. The HEAD is the entry point of the linked list whereas the TAIL is the last node of the list.
There are three common types of linked list:
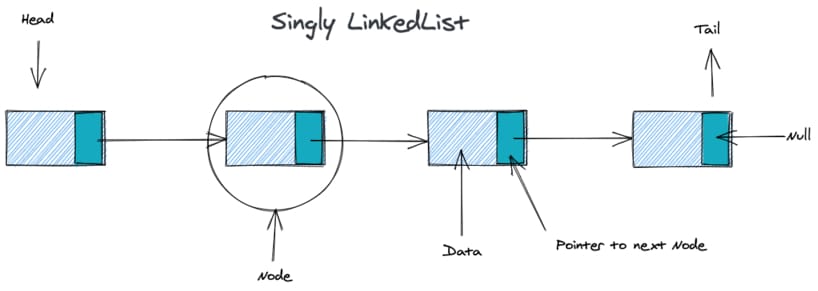
- Singly Linked List
The singly linked list is the simpliest linked list as the nodes only have one pointer / reference to the next node in the list.
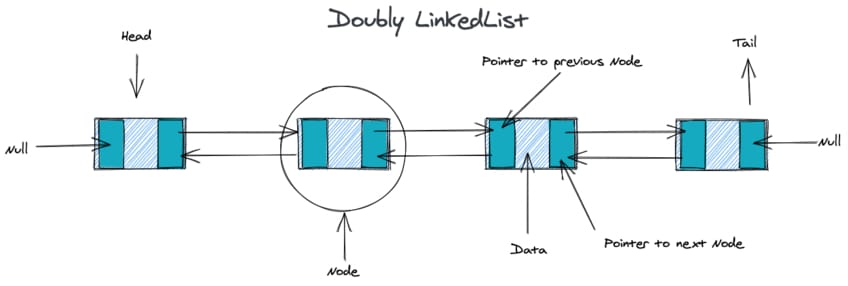
- Doubly Linked List
In the doubly linked list, the list nodes have two references / pointers. One to the previous node and one to the next node.
- Circular Linked List
Circular linked list can be singly or doubly:
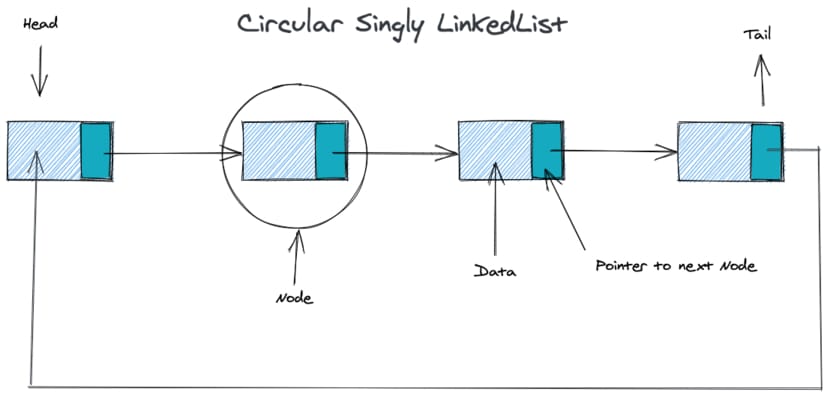
- Circular Singly Linked List
In the circular singly linked list, the TAIL has a reference / pointer to the HEAD.
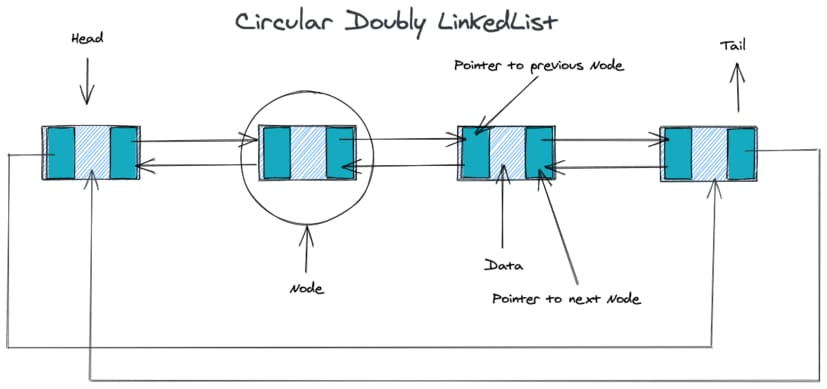
- Circular Doubly Linked List
In the circular doubly linked list, the TAIL has a reference to the HEAD and the HEAD has a previous node reference to the TAIL.
Benefits
In a linked list, the insertion and deletion operations are easier than in an array. This is because, in a linked list, to insert or delete a node in the list, you only to change the previous node pointer. Furthermore, there is no need to re-index the whole list where as it a needed step with arrays.
Downsides
The main downsides of linked list is the lack of direct node access via an index. This force a search operation on a linked list to traverse the list and thefore be an O(n) operation.
Practical uses in web development
A linked list can be used in many scenarii, one of which the the web browser history back and forward operation that be implemented with a linked list of page visited (or with stacks). Drag and Drop item sorting is also a valid use case for a linked list.
Singly Linked List
We will now implement a singly linked list using Typecript class syntax. In order to build our linked list we must first create our list and how our list nodes we will be represented.
- The list
export class LinkedList<T> {
  head: Node<T> | null | undefined
  size: number
  constructor() {
    this.head = null
    this.size = 0
  }
}- The node
class Node<T> {
  data: T
  next: Node<T> | null | undefined
  constructor(data: T, next: Node<T> | null = null) {
    this.data = data
    this.next = next
  }
}
Basic methods
We will now implement a few basic methods
- insertFirst()
Starting simply with the insertFirst() method that will insert the data as the new HEAD of the linked list. This method simply initiate a new Node with the passed data and set its pointer to the former head of the list and finally increment the list size.
  insertFirst(data: T) {
    this.head = new Node(data, this.head);
    this.size++;
}- insertLast()
The insertLast method is barely more difficult. First we create a new Node with the data but don't set a next pointer so that is next property is null. Then we test if the list has a HEAD (if not, its an empty list and we insert the data as the list HEAD). If the list is not empty, we traverse the list until we find the TAIL node and set the TAIL next pointer to our new node and finally increment the list size.
  insertLast(data: T) {
    const node = new Node(data);
    let current;
    if (!this.head) {
      this.head = node;
    } else {
      current = this.head;

      while (current.next) {
        current = current.next;
      }
      current.next = node;
    }
    this.size++;
}- getAt()
The getAt method allow us to find a node by its position / index in the list. It will very useful for the insertAt method. The method itself is simple, we traverse the list until the count is equal to the provided index and return the found node.
getAt(index: number): Node<T> | null {
    let current = this.head;
    let count = 0;

    while (current) {
      if (count === index) {
        return current;
      }
      count++;
      current = current.next;
    }
    return null;
  }
Helpers methods
As with any other data structure implementation, we can implement some helper methods to monitor our list. Following in a basic print method that log the data field of each node of the list.
- printList()
  printList() {
    let current = this.head;
    while (current) {
      console.log(JSON.stringify(current.data, null, 2));
      current = current.next;
    }
}- getListAsArray()
This method simply uses a while loop to traverse our list and push each node data field in the array that we return after the while loop finish.
 getListAsArray(): Array<T> {
    let current = this.head;
    let arr: Array<T> = [];
    while (current) {
      arr.push(current.data);
      current = current.next;
    }
    return arr;
  }
More advanced methods
In the following methods we will build on our basic methods to implement sightly more advanced ones : insert at index, remove at index and clearList
- insertAt()
This method allow us to insert new node at a given index.
- First, we check if the provided index is not out of bound.
- Then if the index is 0 or the list is empty, we use the insertFirst() method we previously created.
- If the index is another number then we have to find the previous node in the with the getAt() method.
- If we find a previous node, we create our new Node, set its next node pointer to the node that previously followed our previous node and set the previous node pointer to our new node.
- Finally we increment the size of the list.
  insertAt(data: T, index: number) {
    if (index > this.size || index < 0) {
      outOfBoundIndexError(data, index);
    }

    if (!this.head || index === 0) {
      this.insertFirst(data);
      return;
    }

    let previous = this.getAt(index - 1);
    if (!previous) {
      outOfBoundIndexError(data, index);
    } else {
      let newNode = new Node(data);
      newNode.next = previous && previous.next;
      previous.next = newNode;
      this.size++;
    }

    return this.head;
}- removeAt()
In order to remove a node at a given index, we need to :
- Verify the given index
- Initialize a current, previous and count.
- If the index is 0 we simply remove the old head by setting it to the following node in the list.
- Else we have to traverse the list, which we do here with a while loop until we react the target node.
- Then we set the target node previous node pointer to the target node following node, effectively cutting out the target out of the list.
- Finally we decrement the list size.
 removeAt(index: number) {
    if (index > this.size || index < 0) {
      return;
    }

    let current = this.head;
    let previous;
    let count = 0;

    if (index === 0) {
      this.head = current?.next;
    } else {
      while (count < index) {
        previous = current;
        count++;
        current = current?.next;
      }
      if (previous) {
        previous.next = current?.next;
      }
    }
    this.size--;
}- clearList()
With this method we aim to remove all the list node data field from memory. If we only wanted to clear the list without removing each node from memory we could simply set the head to null. But in order to remove each node effectively we need to take another approach:
- We create a recursive function that will traverse our list and set the data field of each node to null.
- We call our recursive function with the list HEAD.
  clearList() {
    const recurseDelete = (data: Node<T> | null | undefined) => {
      if (data === null || data === undefined) {
        return;
      } else {
        recurseDelete(data.next);
        data = null;
        this.size--;
      }
    };

    recurseDelete(this.head);

    if (this.size === 0) {
      return true;
    } else {
      return false;
    }
  }
From the same category
The Tree
Data Structures2022-12-23
Typescript implementation of a tree.

The Hashtable
Data Structures2020-12-05
Typescript implementation of a basic hashtable with insert, get and remove methods.

The Queue
Data Structures2020-05-24
Typescript implementation of a basic queue and of a priority queue.

The Stack
Data Structures2020-05-19
Typescript implementation of a stack.